
Advertisement [ ? ]
Site Links
- Lease Calculator
- Advertise on 14,000+ pages
- My Car ongoing Review
- Members' Chat
- Cars For Sale
- Car Dealers
- Honda "Fit" Manual
- Hyperflex Bushings
- For Sale
- Fix your Car
- Car Manuals
- other manuals - Reference Materials
- DIY Repairs
- Articles
- Video
- Link with Us
- Search Help
- Code your Mac!
- Fly, race, anything R/C
- DIY repair guides
- Z-Seven
- Mechanic's Blog
- Free Files
Replacing the timing belt on 95 toyota Camry v6
Car: Toyota, Camry, 1995, V6 - Back to Fix-It - Toyota Repair Manuals
Q.What's the easiest way to place the timing belt on a 1995 toyota camry v6 3000

Answer this is not an easy job but can be done
Remove the right hand front wheel.
Remove the fender apron seal.
Remove the windshield washer and radiator reservoir tanks.
Disconnect and label all vacuum hoses, cables, electrical wiring and remove the cruise control actuator and bracket.
Remove the power steering pump with bracket.
Remove the alternator and alternator bracket.
Undo the three clips, remove the five bolts and remove the upper (No. 2) timing belt cover and gasket.
Align the line mark of the camshaft pulley with the top end of the cylinder head by turning the crankshaft pulley bolt CLOCKWISE.
Using a spanner wrench to hold the crankshaft pulley stationary, remove the pulley set bolt and plate washer.
Remove the five bolts and remove the No. 1 timing belt cover and gasket.
Using a small prybar or similar tool, remove the tension spring. The use of any tool that will pinch the spring is not recommended.
Loosen the No. 1 idler pulley mounting bolt.
Remove the timing belt.
Using a spanner wrench to hold the camshaft pulley, remove the setbolt.
Install a two-armed pulled and remove the camshaft pulley. Be careful, the pulley may spring off so don't drop it!
Remove the No. 1 idler pulley.
Using a spanner wrench to hold the injection pump drive pulley, remove the setbolt. Install a two-armed pulled and remove the drive pulley. Be careful, the pulley may spring off so don't drop it!
Remove the No. 2 idler pulley.
Using a gear pulled, remove the crankshaft timing pulley.
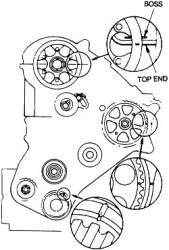
Timing pulley alignment
To install:
Using a driver and hammer, carefully drive the crankshaft timing pulley into position.
Install the No. 2 idler pulley, tighten the bolt to 27 ft. Lbs. (37 Nm).
Slide the injection pump drive pulley over the pump key and tighten the bolt to 47 ft. Lbs. (64 Nm). Do not use an impact wrench.
Install the No. 1 idler pulley and finger tighten the mount bolt to the extent that the idler pulley is free. Install the pulley guide bolt, then tighten the bolt to 65 inch lbs. (7 Nm). Be sure the idler pulley bracket can move left to right by hand.
Align the camshaft knockpin with the camshaft timing pulley and slide the pulley onto the shaft. Install the setbolt and plate washer and tighten it to 65 ft. Lbs. (88 Nm).
Align the mark of the camshaft pulley with the top end of the cylinder head. DO NOT align the cylinder head cover with the boss.
Align the grooves of the crankshaft timing pulley and the oil pump.
Align the cavity of the injection pump drive pulley with the line mark on the water pump.
Hold the injection pump drive pulley in place until the timing belt is completely installed.
Install the timing belt onto the camshaft pulley.
If the OLD timing belt is being installed make sure the direction arrow is facing in the direction of engine rotation an that the match marks made on the belt and timing pulleys are properly aligned. If a NEW belt is being installed, install the belt so that the numbers and letters can be read from the rear end of the engine.
Hold the injection pump pulley still with a wrench and install the timing belt onto the pulley. The timing belt should be evenly meshed with the pulley and should not be loose.
Install the timing belt onto the water pump and crankshaft pulleys. The timing belt should be evenly meshed with the pulley and should not be loose.
Install the timing belt onto the No. 2 idler and oil pump pulleys. The timing belt should be evenly meshed with the pulley and should not be loose. Be sure the belt is not twisted or too tight.
Install the tension spring. Do not pinch the tension spring with pliers.
Turn the crankshaft CLOCKWISE two complete revolutions from TDC to TDC.
Visually check that each pulley is aligned with its timing mark. If the marks do not align, remove the belt and reinstall it.
Tighten the No. 1 idler pulley set bolt to 27 ft. Lbs. (37 Nm). DO NOT move the idler pulley bracket while tightening the set bolt.
Install the right hand engine mounting bracket with the retaining bolts. Tighten the 10mm bolts to 27 ft. Lbs. (37 Nm) and the 12mm bolts to 47 ft. Lbs. (64 Nm). If the vehicle is equipped with power steering and/or air conditioning, do not install the 12mm bolts.
Install the right hand mounting insulator.
Lower the engine.
Install the timing belt guide. Make sure that the cup is facing outward.
Install the upper (No. 1) timing belt cover with the new gasket. Install and tighten the five bolts.
Drive the crankshaft pulley onto the crankshaft.
Hold the crankshaft pulley stationary with the same tool used during removal and install the set bolt and plate washer. Tighten the set bolt to 72 ft. Lbs. (98 Nm).
Install the lower timing belt cover and new gasket with the three clips and five bolts.
Install the alternator and alternator bracket. Adjust the belt tension.
Install the power steering pump and adjust the drive belt tension.
Install the cruise control actuator and bracket. Connect the harness, cables and vacuum hoses.
Check and adjust the injection timing.
Install the fender apron seal.
Install the right front wheel.
Check and adjust the engine idle and maximum speeds.
>>Contribute your Answer<< - Submit your Question