
Advertisement [ ? ]
Site Links
- Lease Calculator
- Advertise on 11,000+ pages
- My Car ongoing Review
- Members' Chat
- Cars For Sale
- Car Dealers
- Honda "Fit" Manual
- Hyperflex Bushings
- For Sale
- Fix your Car
- Car Manuals
- other manuals - Reference Materials
- DIY Repairs
- Articles
- Video
- Link with Us
- Search Help
- Code your Mac!
- Fly, race, anything R/C
- DIY repair guides
- Z-Seven
- Mechanic's Blog
- Free Files
2003 chevy suburban needs major tune up 100K miles.
Car: Chevrolet, Suburban, 2003, 5.3L - Back to Fix-It
Q.2003 chevy suburban needs major tune up 100K miles. Is this something I can do myself and if so what are the necessary parts and instructions.
MODEL C15906, 5.3 LITERS, 1500 , 2WD.
I have basic tools but need to know if special equipment is needed to complete the tune up as well.

Answer I included a 90,000 mile service Just in case it was missed.
Spark plugs and wires are pretty simple. Plug wires will be hard to remove and my even break. Would be best to replace anyways. Fuel filter kind of a pain. May take a special release tool to do it.
Changing transmission fluid and filter isn't bad but you have to be careful not to damage a sensor when remove the pan. I will include in another post.
90,000 Miles (150 000 km)
Check rear/front axle fluid level and add fluid as needed. Check constant velocity joints and axle seals for leaking.
Replace fuel filter. An Emission Control Service. (See footnote .)
Replace engine air cleaner filter on vehicles without a restriction indicator. If equipped with a change indicator, inspect the indicator. If necessary, replace the filter. If vehicle is driven in dusty/dirty conditions, inspect the change indicator (if equipped) at every engine oil change. See Engine Air Cleaner/Filter for more information. An Emission Control Service. (See footnote .)
Rotate tires. See Tire Inspection and Rotation for proper rotation pattern and additional information. (See footnote +.)
97,500 Miles (162 500 km)
Check rear/front axle fluid level and add fluid as needed. Check constant velocity joints and axle seals for leaking.
Rotate tires. See Tire Inspection and Rotation for proper rotation pattern and additional information. (See footnote +.)
100,000 Miles (166 000 km)
Inspect spark plug wires. An Emission Control Service.
Replace spark plugs. An Emission Control Service.
Change automatic transmission fluid and filter if the vehicle's GVWR is over 8,600 lbs or if the vehicle is mainly driven under one or more of these conditions:
In heavy city traffic where the outside temperature regularly reaches 90F (32C) or higher.
In hilly or mountainous terrain.
When doing frequent trailer towing.
Uses such as found in taxi, police or delivery service.
If you have not used your vehicle under severe service conditions listed previously and, therefore, have not changed your automatic transmission fluid, change both the fluid and filter.
Change transfer case fluid.
Except 8.1L V8 Engine: Inspect Positive Crankcase Ventilation (PCV) valve. An Emission Control Service.
150,000 Miles (240 000 km)
Drain, flush and refill cooling system (or every 60 months since last service, whichever occurs first). See Engine Coolant for what to use. Inspect hoses. Clean radiator, condenser, pressure cap and neck. Pressure test the cooling system and pressure cap. An Emission Control Service.
Inspect engine accessory drive belt. An Emission Control Service.
and glad I could assist you. Let me know if you don't understand something.
Answer It says to remove the Catalytic Converter. But you can just raise up the back enough to get it to slide out. I never remove it when I drop a pan down.
Automatic Transmission Fluid and Filter Replacement
Removal Procedure
Caution: When the transmission is at operating temperatures, take necessary precautions when removing the drain plug, to avoid being burned by draining fluid.

Raise and suitably support the vehicle.
Place a drain pan under the transmission oil pan.
Remove the oil pan drain plug, if equipped.
If necessary, remove the bolts and position aside the range selector cable bracket for clearance while lowering the pan. It is not necessary to remove the cable from the lever or bracket.
Remove the catalytic converter. .
Remove the oil pan bolts from the front and sides of the pan only.
Loosen the rear oil pan bolts approximately 4 turns.
Lightly tap the oil pan with a rubber mallet in order to loosen the pan to allow the fluid to drain.

Remove the remaining oil pan bolts.

Remove the oil pan and the gasket.
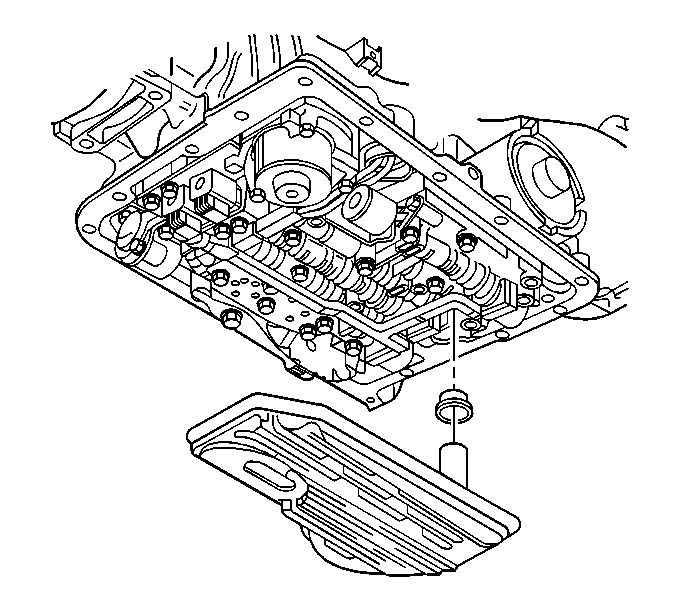
Grasp firmly while pulling down with a twisting motion in order to remove the filter.

Remove and discard the filter seal. The filter seal may be stuck in the pump; if necessary, carefully use pliers or another suitable tool to remove the seal.
Inspect the fluid color.
Inspect the filter. Pry the metal crimping away from the top of the filter and pull apart. The filter may contain the following evidence for root cause diagnosis:
Clutch material
Bronze slivers indicating bushing wear
Steel particles
Clean the transmission case and the oil pan gasket surfaces with solvent, and air dry. You must remove all traces of the old gasket material.
Installation Procedure

Coat the NEW filter seal with automatic transmission fluid.
Install the NEW filter seal into the transmission case. Tap the seal into place using a suitable size socket.
Install the NEW filter.
View Full Image
Install the oil pan and NEW gasket.
View Full Image
Install the oil pan bolts.
Tighten
Tighten the bolts alternately and evenly to 11 Nm (97 lb in).
Install the catalytic converter. .
If previously removed, install the range selector cable bracket and bolts.
Tighten
Tighten the bolts to 25 Nm (18 lb ft).
Tighten
Tighten the plug to 18 Nm (13 lb ft).
Lower the vehicle.
Fill the transmission to the proper level with DEXRON III transmission fluid. .
Check the COLD fluid level reading for initial fill only.
Inspect the oil pan gasket for leaks.
>>Contribute your Answer<< - Submit your Question